Dryer
Maintenance of the Clothes dryer
Washing is probably one of the most common household chores. Without a working washing machine and dryer, this task would be considerably more difficult. For this reason, it is important to routinely maintain your clothes dryer to keep it in good condition.
These are some of the clothes dryer maintenance tips so you can save money and make your home safer.
- Clean the lint
Lint is an unavoidable by-product of using dryers. An important part of dryer maintenance is emptying the lint filter after each dryer cycle to improve efficiency and reduce fire risk. Even if you’re running a light load with very little lint on the screen, you should still remove it.
An important safety measure is cleaning the vent pipe from your dryer to the outside. Lint often flows through this pipe and can build up both in the pipe and on the outside vent. If your clothes are taking longer to dry than usual, this may be a sign that you need to clean the vent pipe.
Best practices for maintaining the dryer include cleaning the tube at least once a year. Make sure the gas flowing to the dryer is turned off before performing any maintenance. A great tool for cleaning the entire pipe is a pipe brush with a long, flexible handle.
Lint can also build up under and behind your dryer. So when cleaning the vent pipe, you will need to move the dryer to reach these areas. It is also helpful to open the dryer to reveal the motor, belt, and drum as these areas can build up lint. If you are unsure how to open the dryer safely, contact an equipment technician for routine maintenance. - Wash the lint screen
During routine clothes dryer maintenance, washing the lint screen can be helpful. Some debris on the lint screen can block airflow, and washing thoroughly can remove excess dirt.
You will know if the screen needs cleaning by taking it to the sink and pouring some water through it. If the water collects on the screen and does not flow through, you need to clean it thoroughly. Carefully wash the lint screen with detergent and warm water. - Be careful what you put in the dryer
The maintenance technique of the clothe dryer is the simplest one: make sure that there are no loose items in all pockets, such as pens, coins, lipstick, or anything that may damage the clothes. Be sure to wash your wet clothes before drying them to ensure that all dirt is washed away. - Clean the dryer drum
There will be no need to clean the dryer’s inner tube frequently if you have been putting items that are clean in the dryer. However, if something enter your dryer (e.g lipstick), you should clean it instantly.
Wiping the roller with a damp cloth can easily remove excess dust and hair. If sticky items appear on the dryer drum side, run the dryer for a few minutes to heat the substance, and then scrape it off with a scraper or the edge of a credit card. - Check the vents and pipes
Besides cleaning the vents and pipes for excess fluff, you also need to check that the channels provide the best airflow. Make sure that there are no kinks in the ventilation system so that air can flow out freely. Hire professional equipment technicians to complete these dirty tasks. Professional dryer vent maintenance can help prevent dangerous malfunctions that can cause fires, overheating, excessive drying time, and mold growth. - Clean the exterior
Water, detergent, bleach, and dust may accumulate on the outside of the dryer. Wipe the outside of the dryer with a damp cloth. This not only removes dirt but also improves the aesthetics of your house. - Check the Flap of the external vent
Usually, the dryer’s air pressure will open the damper, and if there is no such pressure, the damper will remain closed. If you open it, it may cause HVAC-treated air to leak out of your house, harmful organisms may enter, or the dryer’s efficiency may decrease. If the sticky flaps cannot be opened and closed properly, you should lubricate or replace it. - Keep the dryer level
You should make sure that the dryer is on the ground. In addition to being noisy, unbalanced clothes dryers can also cause jitter, which will wear belts and motors prematurely and loosen certain clothes dryers’ hardware. Make sure your clothes are evenly distributed and don’t overfill your luggage. Place a spirit level on the machine to see if the surface is flat. Use a wrench or pliers to adjust the legs, or move the dryer around to make it run more efficiently and quietly.
How Hot Should a Dryer Get?
The temperature reached by the dryer depends on the make and model of the dryer and the setting of the dryer. The average temperature of most dryers is 125 to 135 degrees Fahrenheit.
It is important to note that water does not have to reach a boiling point to start perspiration and evaporation. Consider having a cup of hot coffee. Although the water in the coffee is not boiling, a lot of steam is still coming out of the cup. Therefore, the temperature of the dryer should not be heated so much that it will burn clothes.
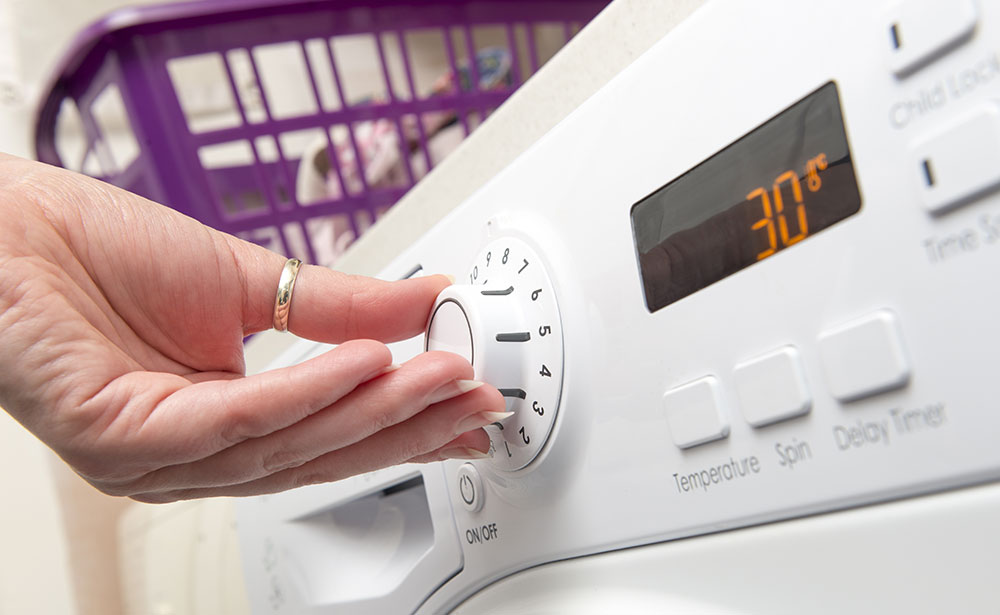
Instructions for setting the dryer heat
Both the dryer and the laundry provide information on setting the appropriate drying temperature. These dryer settings are directly related to the warmth of the dryer. To avoid damage, some clothes require a cooler dryer setting.
Although temperature settings can vary from different manufacturers, most settings offer fine, permanent pressure, and normal settings. The clothing label usually indicates which setting is best or recommends dry cleaning.
The gentle cycle is ideal for materials like rayon or silk. The permanent pressing is best for everyday clothing, while the normal setting should be used for items such as towels, sheets, and jeans.
How to know that the dryer is too hot
Signs of overheating of the dryer indicate damage to clothing. If you pull the laundry out of the dryer and find burn marks on it, it means that the dryer is operating at too high a temperature. If your dryer feels hot to the touch, this could be another sign of overheating. Of course, the dryer feels a bit warm when running, but it shouldn’t be too hot.
How to fix a dryer overheating problem
If you find that the dryer is overheating, you should resolve the problem as soon as possible. Note that overheating can negatively affect the dryer itself. If the problem is not resolved, excessive heat can damage the dryer’s various components and cause damage. There are a few issues that can affect the temperature of the dryer.
| Problem | Likely Cause | Solution |
| Airflow problem | Airflow is blocked in the dryer. | Make sure that no lint accumulates in the trap. Clean the lint trap after each loading. Use a vacuum cleaner to remove lint from the vents and ducts. |
| Damaged heating element or burner | Dryer heat source is not working properly | Replace the heating element or the burner on the dryer. Please refer to your user manual to ensure that you have ordered the correct replacement parts. |
| Damaged circulation thermostat | Circulation thermostat is damaged. | Open the top and front (and possibly the back) of the dryer to access the circulation thermostat. Use a multi-meter to test the thermostat. A value of zero or infinity indicates that it is working. If the reading is not good, replace the thermostat. |
| Tripping of the safety thermostat | The safety thermostat or high-limit thermostat switches off the heating source. | A single trip on the safety thermostat can interfere with proper function and must be replaced. If the safety thermostat does not work, the dryer may overheat. It is also important to note that if the safety thermostat trips, the tumble dryer may malfunction and cause overheating. Make sure that other components are working properly and that there is no obstruction to airflow. |
| Bad fan wheel | A cracked fan wheel can obstruct normal airflow in the dryer and cause overheating. | Open the top of the dryer and faceplate and check the fan wheel. You may need to separate the drum bearing’s drying drum to access the electric motor with the fan wheel. Check if the fan impeller is defective and if any obstacles are preventing the impeller from rotating. If the fan wheel is damaged, replace it. Please consult your user manual to ensure you have purchased the correct replacement parts. |
The dryer is not hot enough.
If the dryer temperature is not hot enough, it may not work properly. The table below shows some of the problems, likely causes and solutions to a dryer that is not dry enough.
| Problem | Likely Causes | Solution |
| Thermostat failure | A thermostat that cannot read the temperature correctly may feel that the temperature is much higher than the actual temperature. | Solve the problem by checking the thermostat unit’s wiring. If that doesn’t work, make sure to replace it. |
| Bad heat source | Damaged heating elements or burners may not heat the air properly. | Check the dryer heat source and open your eyes to see any chips or cracks nearby. |
| Defective Timing motor | If the timer doesn’t work properly, it may not set the heater to heat the air flowing through the dryer. | Test the timing motor by removing the timing motor from the control panel (unplugging the power cord first) and connecting it to a multi-meter. |
| High limit thermostat | Failure of the upper thermostat can lead to insufficient heating and overheating. Incorrect temperature readings can trigger the upper-temperature regulator before the temperature reaches the upper limit. | Replace the upper-temperature regulator. |

Why is my dryer not spinning?
Many things can prevent the dryer from doing its job effectively. The common problem is that the dryer won’t spin. While many issues prevent the dryer from spinning here, a few common causes can help you resolve the problem.
How to tell if the dryer has stopped spinning
If you’re like most people, you may tend to toss your clothes in the dryer, turn it on, and walk away. If your clothes are still wet when you return, think of this as a sign that the dryer is not rolling properly.
The dryer can also spin but will stop in the middle of the cycle. This is a sign of whether your clothes are still wet after going through the dryer.
Note: If you fill the dryer with water, the clothes may not have enough room to turn around easily, even if the dryer is spinning. This can trap steam in the dryer and cause your clothes to stay damp after the entire cycle.
Reasons and solutions for a non-rotating dryer
Check out some of these troubleshooting steps to determine why the dryer might not be spinning and how to get it back in working condition.
1) Check that the dryer has power
If you turn on the dryer, but absolutely nothing happens, there may be a power problem. Make sure the dryer is in place. If the dryer is not plugged in, plug it in to restore power.
If you find that the dryer is connected, check the circuit breaker to see if the dryer circuit breaker has tripped. If so, reset the dryer circuit breaker by turning it off completely and then on again. If this does not turn the dryer again, please contact a professional equipment technician.
2) Check the door switch
For safety reasons, the dryer has a switch to ensure that the dryer does not work when the door is open. First, check that the door is fully closed and working with the door switch. Solving the problem may require a quick adjustment of the door. After confirming that the door has closed and the switch has been properly pressed, it’s time to check the switch yourself.
Please pull the power plug out of the socket before attempting to remove the switch. After turning off the dryer, you can check the door switch.
The switch is usually a small white cylindrical nail near the door lock. Disconnect the cable from the door switch so that you can test with a digital multi-meter.
If you need to replace the door switch, you can find the door switch kit online to do it yourself. If you are not satisfied with the DIY repair, please contact a repair technician.
3) Check the drive belt
Drive belt damage is a common cause of non-rotating tumble dryers. As mentioned above, this may not come as a surprise since the belt’s main job is to turn the drum.
Before opening the dryer to touch the drive belt, there is an easy way to check for a problem with the drive belt by trying to spin the drum yourself. Just open the drying door, grab the inside of the drum, and turn it. There should be some resistance. If you can turn the drum easily, there may be a problem with the belt.
To check the belt:
- Disconnect the machine from the power supply or switch off the dryer.
- Loosen all clamps attached to the top of the dryer with a spatula.
Take the top of the dryer out of the drying cabinet.
Find the dryer belt. The drying belt is usually made of very thin black rubber. If you can’t see the belt, it may have slipped, which immediately indicates why the drum isn’t rotating. If the belt is broken or damaged, it must be replaced.
Replace the drive belt:
- Loosen the clamp with a spatula and carefully pull the front part away from the dryer cabinet.
- With the front panel removed, find the motor and idler pulley to the rear of the drum and loosen the belt on both.
- Gently lift the photosensitive drum and slide it to remove it from the drum bearing (away from the back of the dryer).
- Slide the belt away from the drum.
- Take the new dryer belt, wrap it around the drum, reconnect the drum to the drum bearing, and place the belt back on the pulley and motor pulley.
Check the pulley assembly.
The pulley assembly in the dryer keeps the drive belt tensioner to grip the pulley without slipping. If the pulley assembly is loose or damaged, the belt may not stay on the drum.
The pulley in the dryer is made up of small rubber or plastic wheels on metal arms. A broken pulley or a broken arm of the pulley can cause malfunction. Blocked or difficult-to-move wheels can prevent the belt from rotating the drum freely.
To access the pulley assembly:
- Remove the top and front covers of the dryer and locate the idler pulley next to the motor. The tension created by the drive belt goes a long way in keeping the idler pulley in place.
- Slide the belt away from the motor, and you should be able to pull out the pulley.
- Replace the pulley with a new pulley assembly by threading the drive belt through the new idler pulley and the new motor.
Check thermal fuse
The thermal fuse is an important safety function of the dryer. It turns off automatically when the the dryer is too hot. A faulty thermal fuse can interrupt the motor’s power supply while the heating element remains switched on. This may be the reason the dryer is not spinning.
The thermal fuse is usually located on the back of the dryer near the fan and motor.
To access the fuse:
- Pull the dryer away from the wall and pull out the power plug.
- Remove the back of the dryer. You may need a screwdriver or socket wrench to remove the screws.
- Loosen the wire inserted into the fuse and remove the screw that holds the fuse in place. Replace the thermal fuse.
A defective thermal fuse is often a sign of another problem. If your fuse has blown, please check the other parts of the dryer. Ensure that the wires do not cross each other and that the heating element is clean, free of debris, and not in contact with other metals.
Why is my dryer not drying my clothes?
If your dryer doesn’t dry out, replacing it can be very expensive and expensive. Before replacing, read these common dryer problems and troubleshooting tips to help you out.
Check the basics
Below are some basic things to check first to know why your dryer is not drying clothes.
Is the dryer connected to the power source?
Make sure the dryer is plugged into a power source. If the dryer is plugged in, but there is still no sign of power-up, check the circuit breaker. If the dryer circuit trips, reset it.
If you have an electric dryer, it will work in two circuits: one circuit for the heating element and the other circuit for the rest of the dryer. If the dryer warms up but does not dry, one of the two circuits may be tripped. Check the circuit breaker again and reset the circuit as needed.
Are you overloading the dryer?
Make sure you don’t put too many clothes in the dryer. Putting too much clothes could place excessive pressure on the dryer motor, roller bearings, and other dryer components. This can also prevent your clothes from drying properly.
Check the vents and ducts.
Airflow plays an important role in the normal drying of clothes. Part of the normal operation of the dryer is the flow of air through the dryer openings. Clogged vents are a common cause of poor airflow in the dryer system. One way to determine if the dryer vent is blocked is to turn on the dryer and go outside to feel the airflow exiting the vent. If the weather is slow and not too warm, it might be because you need to clean the ventilation holes.
Try the following steps to clean the vent:
- Disconnect the dryer from the power source.
- Pull the dryer away from the wall and disconnect it from the vent.
- Remove the vent filter cover from the outside and start cleaning the vent. The cause of the blockage is likely due to the build-up of lint. You can use a vacuum cleaner to remove lint from the ventilation holes.
- After the dryer vent has been cleaned, reconnect it to the dryer, slide the dryer back into its original position, and then insert it.
Clean the lint trap
Excessive build-up of piles in the lint collector can obstruct airflow through the dryer. Clean the lint and get into the habit of cleaning the lint after each use. For more thorough cleaning, wash with warm soapy water and allow it to dry completely.
Check the door switch
The dryer has a door switch that prevents the dryer from running when the door is open. If the dryer doesn’t work, make sure the door is closed. If the door is closed but still not working, please open the door and press the door switch manually before starting the machine again. When the dryer is on, you may only need to adjust the door settings to make it press the door switch when it is closed. If it still doesn’t work, your door switch may be defective and need to be replaced.
Are your clothes too wet?
The dryer is not used to drain wet clothes. If your clothes are too wet after washing, they may not be completely dried out of the normal dryer cycle. Check your washing machine’s settings, make sure the cycle is correct, and check for possible malfunctions.
Going beyond the basics
If basic troubleshooting does not resolve your dryer issue, you may need to check further for likely issues. These tasks involve more mechanical and technical aspects but are easy enough for DIY enthusiasts to try out.
Check the drive belt
Drive belt damage is a common cause of non-rotating tumble dryers. As mentioned above, this may not come as a surprise since the belt’s main job is to turn the drum.
Before opening the dryer to touch the drive belt, there is an easy way to check for a problem with the drive belt by trying to spin the drum yourself. Just open the drying door, grab the inside of the drum, and turn it. There should be some resistance. If you can turn the drum easily, there may be a problem with the belt.
To check the belt:
- Disconnect the machine from the power supply or switch off the dryer.
- Loosen all clamps attached to the top of the dryer with a spatula.
Take the top of the dryer out of the drying cabinet.
Find the dryer belt. The drying belt is usually made of very thin black rubber. If you can’t see the belt, it may have slipped, which immediately indicates why the drum isn’t rotating. If the belt is broken or damaged, it must be replaced.
Replace the drive belt:
- Loosen the clamp with a spatula and carefully pull the front part away from the dryer cabinet.
- With the front panel removed, find the motor and idler pulley to the rear of the drum and loosen the belt on both.
- Gently lift the photosensitive drum and slide it to remove it from the drum bearing (away from the back of the dryer).
- Slide the belt away from the drum.
- Take the new dryer belt, wrap it around the drum, reconnect the drum to the drum bearing, and place the belt back on the pulley and motor pulley.
Check the pulley assembly.
The pulley assembly in the dryer keeps the drive belt tensioner to grip the pulley without slipping. If the pulley assembly is loose or damaged, the belt may not stay on the drum.
The pulley in the dryer is made up of small rubber or plastic wheels on metal arms. A broken pulley or a broken arm of the pulley can cause malfunction. Blocked or difficult-to-move wheels can prevent the belt from rotating the drum freely.
To access the pulley assembly:
- Remove the top and front covers of the dryer and locate the idler pulley next to the motor. The tension created by the drive belt goes a long way in keeping the idler pulley in place.
- Slide the belt away from the motor, and you should be able to pull out the pulley.
- Replace the pulley with a new pulley assembly by threading the drive belt through the new idler pulley and the new motor.
Check thermal fuse
The thermal fuse is an important safety function of the dryer. It turns off automatically when the dryer is too hot. A faulty thermal fuse can interrupt the motor’s power supply while the heating element remains switched on. This may be the reason the dryer is not spinning.
The thermal fuse is usually located on the back of the dryer near the fan and motor.
To access the fuse:
- Pull the dryer away from the wall and pull out the power plug.
- Remove the back of the dryer. You may need a screwdriver or socket wrench to remove the screws.
- Loosen the wire inserted into the fuse and remove the screw that holds the fuse in place. Replace the thermal fuse.
A defective thermal fuse is often a sign of another problem. If your fuse has blown, please check the other parts of the dryer. Ensure that the wires do not cross each other and that the heating element is clean, free of debris, and not in contact with other metals.